[WP-CLI] Install WordPress From The Command Line
Calling all WordPress Geeks, we have something for you to play with!
We’ve just installed WP-CLI on all of our shared and reseller servers.
This is in response to all the requests we have received from customers asking how on earth they can install and manage wordpress from the command line, rather than via the usual WordPress GUI.
Okay, the above may not be 100% true.
We actually installed it because we’re a set of geeks and thought it would be pretty cool!
If you think along the same lines as us and would love to manage WordPress from the command line, head on over to the official WP-CLI website for more details and a full list of WP-CLI commands that are now available for you to use.
To help you get started, here’s how you can install wordpress on a shared cPanel hosting account via the command line, using WP-CLI.
Step 1: Enable SSH access for your account
This is easy, all you need to do is open a technical support ticket and ask us to enable shell access for your account.
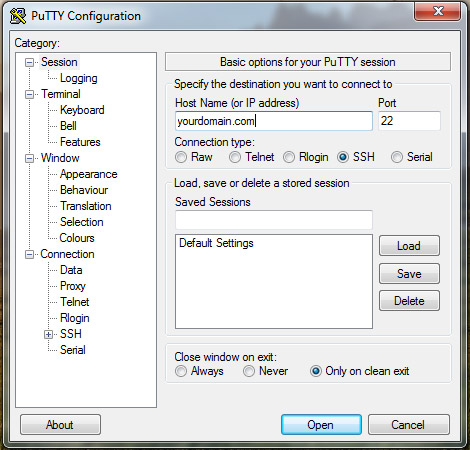
Step 2: Connect to the server via SSH
If you are on a Windows machine, the easiest way to establish an SSH connection to the server is to download and run Putty.
All you need to do is to enter your domain name in the hostname field, and set the SSH port to that of the server. If you are unsure of what SSH port to use (we use non-standard SSH ports) please ask our technical support team.
If you’re a Linux or Mac user, you can connect to the server via SSH by opening up the “Terminal” application and then entering the following command:
ssh your-domain-com -p 22
In the above command, replace your-domain.com with your actual domain name, and change 22 to the SSH port number of your server
You will then be presented with a black screen asking for a username.
Enter your cPanel username and then press the return key on your keyboard.
You will then be prompted for a password.
This is your cPanel password, so type this out (the password WONT be displayed on the screen whilst you are typing it) and then press the return key on your keyboard.
Assuming you have entered the correct username and password, you’ll now be logged into the server via SSH.
Step 3: Navigate to the correct directory
By “correct directory”, we mean the directory that you would like to install WordPress in.
In this example, lets pretend we are installing WordPress on a brand new domain running on a standalone cPanel account, so we will be installing wordpress in /home/cpanel_username/public_html
So to navigate into that directory, we will run this command:
cd /home/cpanel_username/public_html
Make sure you press the return key after running the above command, and also ensure you replace “cpanel_username” with your actual cPanel username!
If you are installing in a different directory, you would alter the path to the directory accordingly. You can also use the “mkdir” command to create a new directory should you need to.
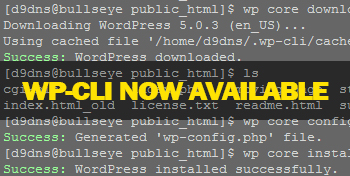
Step 3: Grab the WordPress core files
This is where we start to take advantage of WP-CLI. We can grab the wordpress core files and add them to our chosen directory with a single command:
wp core download
When the core files have been downloaded successfully, you will see a screen similar to this:

Step 4: Create the database
WordPress needs a database to function, but you don’t need us to tell you this, you’re a super geek now!
So use your super geek powers to log into cPanel and create a new database, a new database user, and then add the user to the database with all privileges.
Make a note of the database name, username and password as you will need those in step 5.
Step 5: Set up the config file
This is dead easy and is done with a single command. All you need to do is to edit the command below to contain your database credentials:
wp core config --dbhost=localhost --dbname=your_DB_name --dbuser=your_DB_username --dbpass=your_DB_password
Step 6: Install WordPress
Just like in step 5, installing WordPress via the command line requires a single command:
wp core install --url=your_domain_here.com --title="Your Blog Title Goes Here" --admin_name=Some_Admin_Username --admin_password=A_Strong_Password --admin_email=[email protected]
Do we still need to tell you to change the values highlighted in bold!?
Step 7: Pat yourself on the back
Well done super geek. We’re all done!
If you’ve followed the instructions correctly then you should have a band new WordPress installation sitting on your website. Why not go have a look?
With WordPress installed you can now have a play around with the various other WP-CLI commands that are available to you such as installing plugins or creating new posts.
We hope you enjoy your new found geek status!
WP-CLI is a command line tool for managing WordPress and is available by default to all D9 Hosting customers on Shared, Reseller and Multi Site hosting plans. If you are a VPS or Dedicated Server customer and would like WP-CLI to be installed on your server please get in touch with us and we will be happy to install this for you free or charge.