9 Steps To Make Your WordPress Website Load Faster
WordPress has been a Godsend for people who are looking to set up a website without having any previous experience in the field. Unfortunately, this does tend to lead to people unknowingly creating bloated, resource heavy websites which lead to web server issues and also sluggish website performance.
This page gives you a list of easy to follow tips that you can implement on your WordPress website to improve performance. Please do read through this guide in full and implement the recommended steps as it’ll lead to a much smoother website all round.
Contents
- Install and Configure WP Fastest Cache
- Implement Server-Side Compression
- Implement Browser Side Caching
- Use a Firewall & CDN
- Disable (or limit) Heartbeat
- Use Fewer Plugins!
- Use The Right Hosting Account
- Optimize Your Images
- Keep It Local
- Add indexes to your database
- Conclusion
1. Install and configure WP Fastest Cache
Running a properly configured caching plugin on your website will improve the load time of your website since static HTML versions of your web pages will be created by WP Fastest Cache and served to your website visitors rather than having the pages dynamically created by the server on each visit.
There are other, more advanced, caching plugins out there but we recommend WP Fastest Cache for novice users due to the simplicity of the set up process.
To set up and configure WP Fastest Cache by following the steps below:
Install the plugin
Log into your WordPress admin area and click on Plugins > Add New and then search for “WP Fastest Cache”
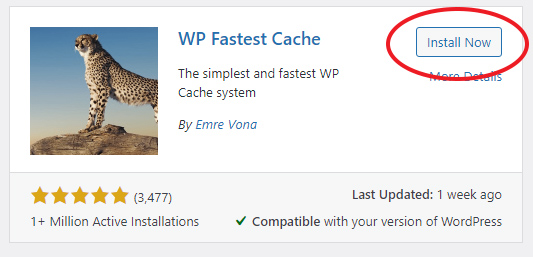
Click on Install > Activate
Configure the plugin
You now need to configure the plugin to ensure it works correctly, so click on “WP Fastest Cache” down the left side of the page.
You can then set up the cache options on a single page. We recommend using the settings shown in the screenshot below but you are free to have a play around with the various settings until you find what works best for your website.

The only other tab you may wish to take a look at is the “CDN” tab if your website is running through Cloudflare. If your website is running through Cloudflare please click here and follow the instructions to make sure the cache plugin works in conjunction with Cloudflare.
2. Implement Server-side Compression
Note: If you enabled the “Gzip” option when configuring WP Fastest Cache then you can skip this step.
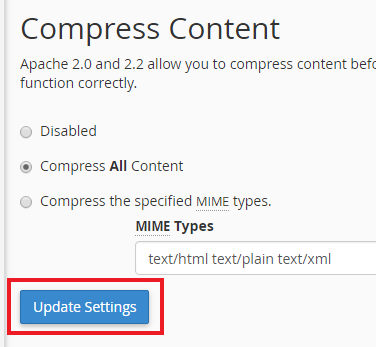
This is a simple step that you can take to have the server compress static files that are served from your website, compressing static files decreases their file size and results in quicker load speeds.
To activate this simply log into your cPanel and click on the “Website Optimization” icon and then click on “Enable”

3. Implement Browser Side Caching
Note: If you enabled the “Browser Cache” option when configuring WP Fastest Cache then you can skip this step.
Implementing browser side caching tells your website visitors web browser to cache certain files in its cache for a pre-set period of time rather than fetching them from the server on each visit. This is another simple thing you can implement to increase page load times.
To do this, you just need to open up your .htaccess file (it’ll be in the document root of your website) and add the following code to the top of it:
## EXPIRES CACHING ##

 ExpiresActive On
 ExpiresByType image/jpg "access 1 year"
 ExpiresByType image/jpeg "access 1 year"
 ExpiresByType image/gif "access 1 year"
 ExpiresByType image/png "access 1 year"
 ExpiresByType text/css "access 1 month"
 ExpiresByType text/html "access 1 month"
 ExpiresByType application/pdf "access 1 month"
 ExpiresByType text/x-javascript "access 1 month"
 ExpiresByType application/x-shockwave-flash "access 1 month"
 ExpiresByType image/x-icon "access 1 year"
 ExpiresDefault "access 1 month"

## EXPIRES CACHING ##
As you can see from the above code, it tells your visitors web browser to cache image files (.jpg, .jpeg, .gif and .png) for 1 year and CSS and HTML for 1 month. You can change any of these values as you see fit, but these tend to work fine for most sites.
4. Use a Firewall & CDN
We cover using a Firewall in the Security Tips section of this guide and whilst it’s one of the most important things you should implement as part of your Security Policy it also brings you some pretty huge performance benefits as well.
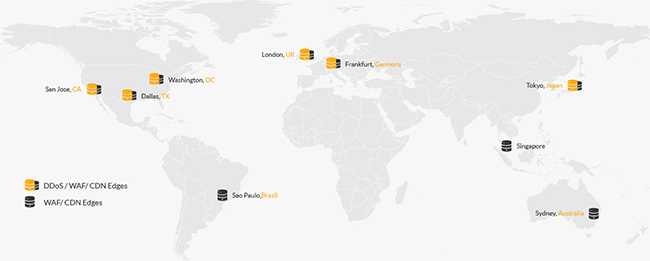
Clients that use the D9 Hosting Firewall typically see a 50% increase in page load speeds across their WordPress websites due to their built in global CDN network.
If you’ve already installed and activated the D9 Firewall as part of our Security tips then you can skip this section, but if not, follow the instructions below.
Step 1: Sign up for the D9 Hosting Firewall & Content Delivery Network (CDN) Service.
Step 2: D9 Hosting will then set up the service for you and route all of your website traffic through the firewall. If you would prefer to configure the firewall yourself then you can simply change your nameservers or your A record to point to the firewall.
All traffic will then be routed through the firewall before it hits your web server. This will filter out any DDOS attacks, hackers, spam, brute force attacks and other website nasties before they hit the server, ultimately leading to a much more stable and secure hosting experience for you.
5. Disable (or limit) Heartbeat
The WordPress Heartbeat creates a connection between your web browser and WordPress. It was primarily used to auto save posts and to log you out of the WordPress admin area after a period of inactvity but recently badly coded plugins have been taking advantage of the Heartbeat feature causing high load and slow performance.
To fix this we can use a plugin to either disable (recommended) or limit the Heartbeat process.
If you’ve already been following our Security Tips then you should have already implemented this, but if not, please click here to go to the Security Tips page and follow step 5.
If for some reason you would prefer not to use the Sucuri Security plugin to disable (or limit) Heartbeat then please follow the steps below to install an alternative Heartbeat Control plugin.
Install the plugin
Log into your WordPress dashboard and click on Plugins > Add New and then search for the “Heartbeat Control” plugin. When you have found it click on Install > Activate
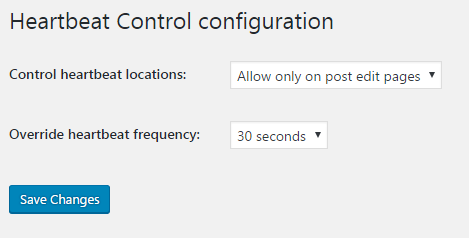
Configure the plugin
Click on Settings > Heartbeat control
Ideally if you can disable Heartbeat completely that would be ideal but if you do want to use it to auto-save your posts, we recommend setting it up using the following values:
6. Use Fewer Plugins!
Plugins are great, but unfortunately not all plugins are created equal. Many plugins have been well thought out and well coded but a lot haven’t and this is where people run into problems.
WordPress is fundamentally a well coded script, with a huge community of core developers, but when you start adding 3rd party Plugins and Themes, coding standards are often not up to scratch. Badly written plugins and themes will often lead to poor performance and security breaches.
So it is very important to only use a plugin that is fundamental to the functioning of your website, the more plugins you install the more code the server needs to parse and the slower your website will run. So if you currently have a slow website, you should see a big performance increase simply by using fewer plugins.
7. Use The Right Hosting Account
In this section we will look at how using the right hosting account can provide you with a big performance boost. It’s also important that you are using the right type of hosting account from a Security stand point but we cover that in more detail in the Security section of this guide.
Unfortunately we still see a lot of users with countless WordPress installations as addon domains under a single cPanel account.
This is a really bad idea from a performance perspective as server resources are distributed per cPanel account and NOT per website.
So let’s say, for example, that a cPanel account is allocated the following resources:
- – 512 MB RAM
- – 1 CPU Core
- – 20 Concurrent Running Processes
And you then have 10 WordPress sites running under that one cPanel account as addon domains, that means that your 10 WordPress sites are all sharing that one pool of resources! So you can see that it won’t take long for those resources to be fully utilized and once they are fully utilized all of your websites are throttled (slowed right down) to keep the server stable.
The solution for this issue is to use an individual cPanel account for every WordPress installation. This means that each website has its own set of resources rather than sharing them with all of your other sites, meaning they will perform much better.
Any of the following account types allow you to run websites on standalone cPanel accounts:
- – D9 Multi Site
- – Reseller
- – VPS
- – Dedicated Servers
So if you’re still running your sites as addon domains under a single account, migrating your existing wordpress sites to standalone cPanel accounts will make an huge difference.
D9 Hosting offer a free Addon to Standalone domain conversion service so please do get in touch with us if you require any assistance with this.
As well as splitting up your domains into standalone cPanel accounts the general setup of the web server hosting your accounts can make a huge difference. At D9 Hosting all of our servers run on the CloudLinux Operating System with the Litespeed PHP Handler + Varnish Cache enabled. This together with enterprise grade hardware and low latency USA and UK networks mean that D9 Hosting customers have some of the fastest loading websites on the web!
8. Optimize Your Images
It’s something that a lot of users forget about with today’s high speed Broadband, but you need to remember that many people are still stuck on slow internet connections so it’s important to properly optimize your images for the web.
We see many clients asking us why their website is loading slowly and when we take a look they’ve got 20 MB of un-optimized images loading on the home page!
Optimizing your website images to reduce their file size is a very good habit to get into and your website visitors with slow internet connections will certainly thank you for it.
There are various ways to do this, and it’s entirely up to you, but we recommend a free image editing package called GIMP.
Once you’ve downloaded and installed GIMP, you can follow the instructions below to make your images “Web Ready” before you add them to your website:
https://docs.gimp.org/en/gimp-using-web.html
9. Keep it Local
You may not realise it, but a common cause of Website slow downs is when content is being pulled from an external server. When your website is loading, any connections it has to make to an external server will slow down the load time of your website.
So when using plugins and themes try and use those that make as few external connections as possible. Common things that make external connections are:
- – Social Sharing Plugins
- – 3rd Party tracking Pixels
- – External Fonts
- – External Javascript
- – External Images
If you’re unsure if any of your content is being loaded locally or externally you can use the following website performance tool: (once the test has run scroll down the page to see a break down of the different elements that are loading on your page)
10. Add indexes to your database
Alright, you caught us out…this article was originally supposed to be “9 steps to make your WordPress website load faster” but this late addition is too good to leave out so we’re going to make it 10 steps!
If you’ve got a large WordPress database then it may well be that the main cause of your website loading at a snails pace is due to indexes (or keys) being missing from your database tables. Adding indexes/keys to common WordPress tables helps WordPress find the data it is looking for much faster, thus reducing the load time.
Simply download and run the following plugin to add indexes to some commonly used WordPress tables:
Conclusion
As with anything with so many different variables involved (3rd party WordPress plugins and themes) you may find that what works for one site may not work for another but the above guide should give you a very good starting point to running a lean, trim wordpress website that’s working to its optimum.