9 Steps To Securing Your WordPress Website
As of February 2017, over 24% of the worlds websites are being powered by WordPress. Unfortunately, with so many websites using WordPress, it has become a prime target for hackers and, as such, it’s vital to take the following additional security steps to secure your WordPress website.
We’ve been hosting tens of thousands of WordPress websites since 2007 and whilst there is no way to make your website 100% hack proof, by following the steps below you should be well on the way to making your site as secure as is realistically possible. So, follow all of the steps below to secure your website, before the bad guys come knocking on your door!
Contents
- Keep Everything Updated
- Delete Anything You Don’t Use
- Install and configure Sucuri Security
- Use The Right Hosting Account
- Use Strong Passwords
- Use a Web Application Firewall (WAF)
- Don’t Use “Dead” Plugins
- Change the Default Admin URL
- Disable XMLRPC.PHP
- Conclusion
1. Keep everything up to date
This is hugely important. It doesn’t matter how many security plugins you run or how strong your usernames and passwords are, if you’re running out of date insecure software on your webspace then sooner or later you’re going to get hacked.
WordPress is constantly releasing new updates and these updates don’t just add new features, they also include important security fixes, so it’s vital to keep everything up-to-date.
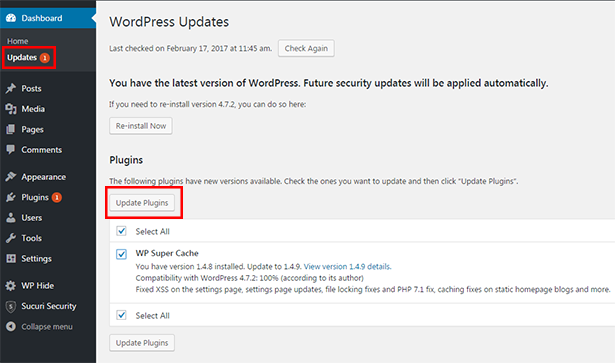
WordPress make it easy to view when updates are available for you. All you need to do is log into your Dashboard and click on the Updates link down the left hand side.
It’s also a very good idea to keep an eye on the WPScan Vulnerability Database, as this is a constantly updated list of known WordPress plugin and theme security issues.
TOP TIP: How to automatically keep everything up to date
2. Delete anything you don’t use
Many people don’t realise this, but it only takes one line of badly written code in any PHP file on your web space for an attacker to gain access. The more code (files) you have on there, the more potential entry points you’re giving the hacker.
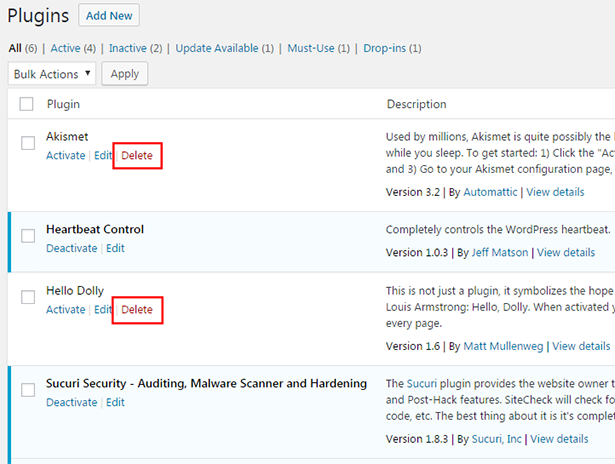
That’s why it is important to only have files on your web space that are vital to the functioning of your website. If you have deactivated plugins or inactive themes sitting there on your webspace, please DELETE them. Even if they are inactive the files are still there, publicly accessible on your webspace.
The same goes for any development/testing installations you have used in the past. If they are no longer in use, DELETE them!
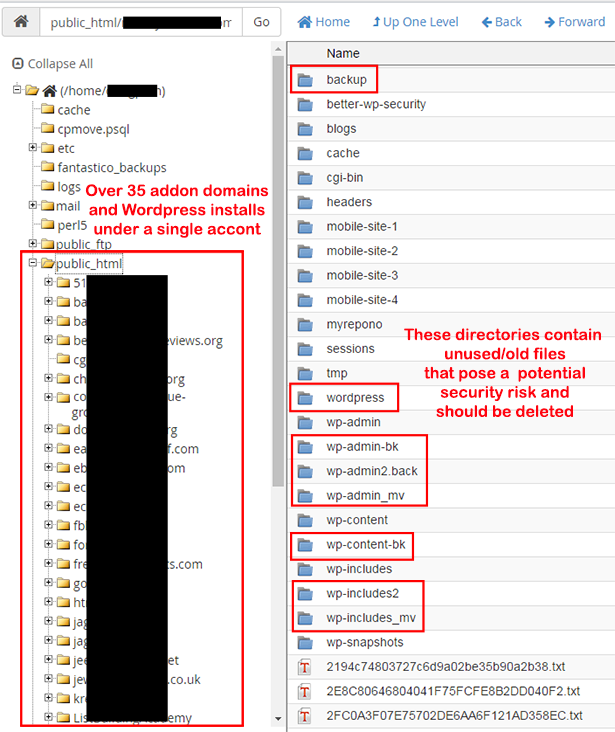
As an example, take a look at the screen shot below. This is a clients account, and not only were they running over 35 WordPress installations under a single cPanel account, they also had numerous old/unused WordPress files on there from many years ago.
Is it a surprise that this account got hacked!?
3. Install and configure Sucuri Security
There are many security plugins out there but we recommend the Sucuri Security plugin due to its ease of use and its lightweight nature. If you have already got a similar security plugin running on your site (Wordfence, iThemes Security, etc) then please disable and then delete it before installing Sucuri Security, as running multiple different security plugins may cause various conflicts for your site.
Install the plugin
The first thing you need to do is to install the plugin by logging into your WordPress admin area and going to Plugins > Add New
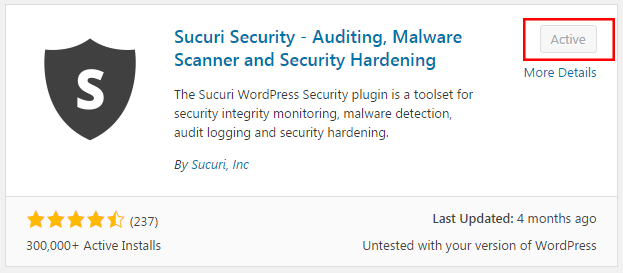
And then search for “Sucuri Security”.
Once you have found the plugin click on “Install” and then “Activate”.
Configure the plugin
We now need to configure the plugin. To do this click on the “Sucuri Security” link down the left side of the page and then click on the “Settings” tab.
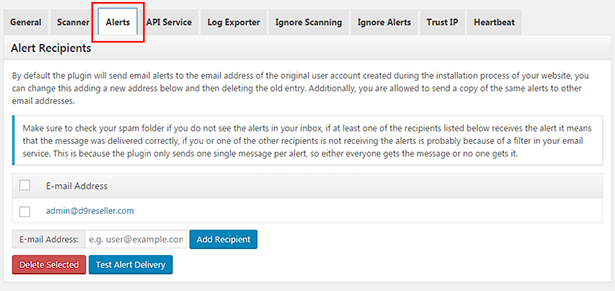
You can leave most of the settings as they are, but on the “Alerts” tab make sure the alerts email address is set to an email address that you actively monitor, and then go through and set which types of alerts you would like to receive.
The next thing you need to do is click on the “Hardening” tab.

You will then be presented with a number of things you can enable to harden your WordPress site against common attack vectors.
The first thing you will see that needs enabling is a Web Application Firewall (WAF) but we cover that in more detail later on, so for now, scroll down the page and click on the red “Apply hardening” buttons next to each of the hardening options you want to enable.
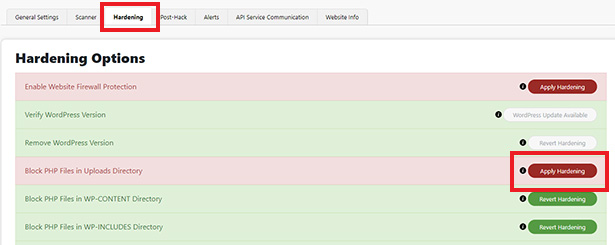
Applying all of the hardening options is entirely optional and may not be required depending on your website but we’d strongly recommend enabled the hardening for at least the “Block PHP Files in Uploads Directory”, “Block PHP Files in WP-CONTENT Directory” and “Block PHP Files in WP-INCLUDES Directory” options.
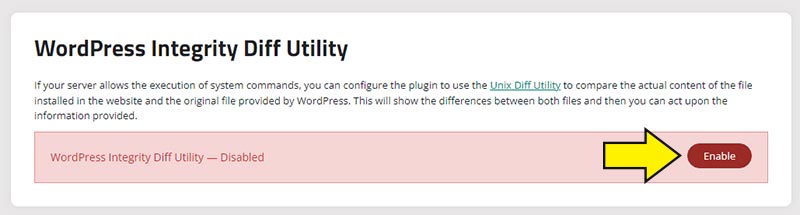
Finally, click on the “Scanner” tab and scroll down to the “WordPress Integrity Diff Utility” heading and click on the “Enable” button. Enabling this will allow the plugin to periodically compare the WordPress files on your hosting account to genuine core WordPress files and will notify you if there are differences between the two. Whilst this part of the software wont stop you from being hacked, it’s a very useful way to quickly identify any issues.
4. Use the right hosting account
Choosing the right hosting account is vital when it comes to WordPress security.
It may seem like a good (cheap!) idea to run loads of WordPress installations under a single cPanel hosting account but this is probably the most common cause of hacks that we see and it’s called CROSS CONTAMINATION!
You’ll probably have one, two, maybe even three websites that you take really good care of, and they’re your pride and joy. On the flip side, you probably also have a few websites that you created years ago that you don’t really care for, but they’re still up and running.
Over the years you’ve probably also done a bit of testing on some long forgotten about sub-domains, or maybe you even installed WordPress in a wrong location once and just forgot to delete it.
These are all scenarios that we see every single day, so I’m sure a lot of you can relate to it, but why is this a problem?
It’s a problem because you’ve got everything running under the same cPanel user account, and if a hacker is able to gain access to your account via an outdated WordPress installation, a vulnerable plugin or theme, or simply through poor password management they have access to every single one of your websites.
All it takes is one insecure piece of code in one of the old websites or forgotten about scripts and every website that you own will be compromised.
That’s why it really is vital to only host one WordPress site per cPanel, that way if anything bad was to happen, only the one website would be affected and not every site under your account. The following hosting packages all allow you to host each website under an individual cPanel account:
- – D9 Multi Site
- – Reseller
- – VPS
- – Dedicated Servers
So if you are currently hosting multiple domains under a single cPanel account, as add on domains, then please get in touch with Customer Service ASAP to have us move you over to a more suitable hosting package.
We should also mention that running each website under individual cPanel accounts brings huge performance benefits as well, but we go into more detail on that side of things in our WordPress performance guide.
5. Use strong passwords
A security guide wouldn’t be complete without the obligutary warning about using strong passwords.
But do we really need to tell you that using your dog’s name followed by a number isn’t a strong password!?
I’m sure you all know the drill by now, but if you’ve been living under a rock and aren’t sure what constitutes a strong password:
DO use a mixture of UPPER and lower case letters
DO use multiple numbers and special characters (!£$@^*)
DON’T use a word that’s in the dictionary
DON’T use your dog’s name…unless your dog happens to be called “Jsy*SlAMCI-091AsJ!”
DON’T use the same password that you’ve been using for the past 10 years on multiple different sites
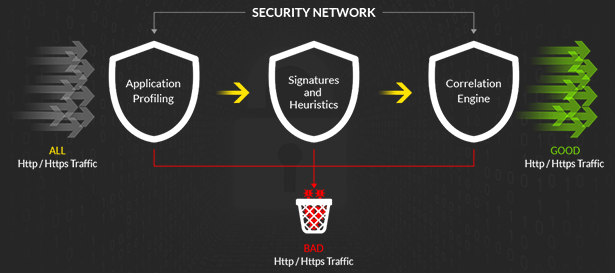
6. Use a Web Application Firewall (WAF)
This is by far the most effective method of protecting your WordPress sites from the bad guys.
In leyman’s terms, a Firewall is like a Shield that sits in front of your websites and stops the bad guys from getting in. So any time traffic comes to your website, it first must go through the firewall that sits in front of your site. If the traffic is legitimate (as in, not malicious) then your website loads as normal.
If, however, the firewall detects the traffic is malicious, it will block the traffic before it gets to your website.
You can use a firewall to block the following attacks before they make it to your web server:
- – DDoS Attacks
- – WP-LOGIN Brute Force Attacks
- – XMLRPC Brute Force Attacks
- – SQL Injection Attacks
- – XSS Attacks
- – Spam
- – Hackers
- – Bad Bots
- – Zero Day (newly discovered) Security Vulnerabilities
- – Other Common WordPress Vulnerabilities
As well as providing the previously mentioned security benefits, a firewall also increases the performance of your website by distributing content via their built-in CDN, meaning not only will you be stopping the bad guys from compromising your website, you’ll also be making your site load faster for your genuine website visitors.
So here’s how you set it up:
Step 1: Sign up for the D9 Hosting Firewall & Content Delivery Network (CDN) Service.
Step 2: D9 Hosting will then set up the service for you and route all of your website traffic through the firewall. If you would prefer to configure the firewall yourself then you can simply change your nameservers or your A record to point to the firewall.
All traffic will then be routed through the firewall before it hits your web server. This will filter out any DDOS attacks, hackers, spam, brute force attacks and other website nasties before they hit the server, ultimately leading to a much more stable and secure hosting experience for you.
7. Don’t use “dead” plugins
Not all plugins are equal.
Some plugins have been well developed by experienced and highly qualified programmers who actively develop the plugin on a regular basis. On the flip side, some plugins will have been developed by a teenager just out of (or still in!) high scool, who wont have taken the same due care to make sure their plugin has been well coded and isn’t going to cause security problems for the end user.
That’s why we always recommend to, firstly, use as few plugins as possible (this is also a good tip for improving the performance of your site) and for those plugins that you do use, make sure they are being actively developed and maintained.
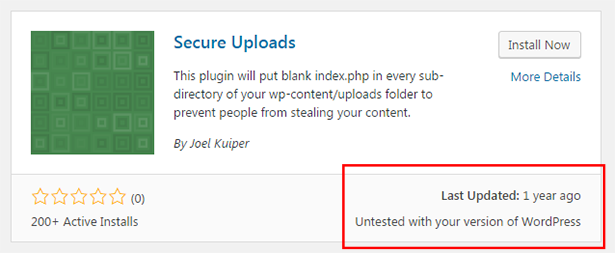
The best way to do this is to log into your wordpress admin area and click on Plugins > Add New and then search for the plugin you are researching. You will then be able to see when it was last updated. If the plugin hasn’t been updated in over a year, it’s a sure sign that the developer has given up on it and it’s no longer being actively supported or developed. If this is the case, it’s a bad idea to use it on your site.
8. Change the default admin URL
2023 Update – You can now use free firewall rules from Cloudflare to protect your WordPress admin area from bots!
NOTE: If you are running the website Firewall that we covered in step 6 then you can skip this section, since the firewall will block wp-login.php attacks.
One of the most common types of WordPress attacks are wp-login.php DDoS attacks. These attacks occur when bots attack WordPress login pages with lots of different username and password variations in an attempt to gain access to your website.
Now, if you’re using a non-standard admin username (ie; NOT admin) and a strong password, the chances of the bots actually gaining access to your admin area are very slim, but it doesn’t stop them from trying! When you’ve got thousands of bots all bombarding your login pages trying to gain access, it can overload your website and cause it to go down.
Some solutions out there (Wordfence for example) will attempt to block IP addresses each time an attack comes in, but this just tends to put additional load on your web server and doesn’t actually solve the problem, because blocking one IP address means that the bot will just return on a different IP address!
The best solution is to either disable WordPress admin area access for everyone apart from yourself and this method works great if your ISP provides you with a static IP address. If they don’t, however, the next best thing is to change the admin URL from /wp-admin and here’s how to do it!
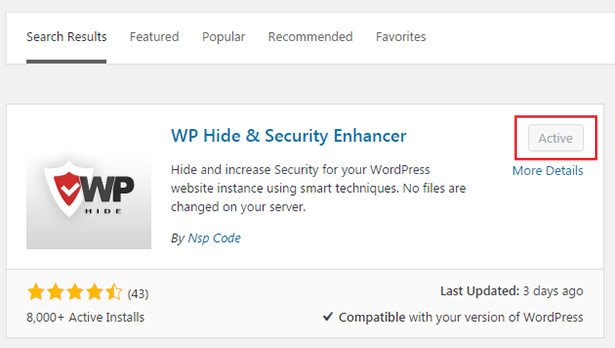
Step 1: Log into your WordPress Dashboard and click on Plugins > Add New and then search for a plugin called “WP Hide & Security Enhancer”
Click on Install > Activate
Step 2: Once the plugin has been installed look down the left hand side of the page and go to WP Hide > Admin
Under the wp-login.php tab, make sure you save a copy of the URL that you can use to revert the plugin back to using the standard wp-login.php file, just incase you forget what custom admin URL you have set up!

Next, you need to enter a replacement for the default wp-login.php. In my example I used the filename d9-login.php but you can use whatever you want.
Under the “Block default wp-login.php” heading, click on “Yes” and then click “Save”
Step 3: We now just need to do the same thing for the default wp-admin path to the admin area. So click on the “Admin URL” tab and enter the new name for the wp-admin directory. In my example I entered d9-admin but you can use whatever you want.
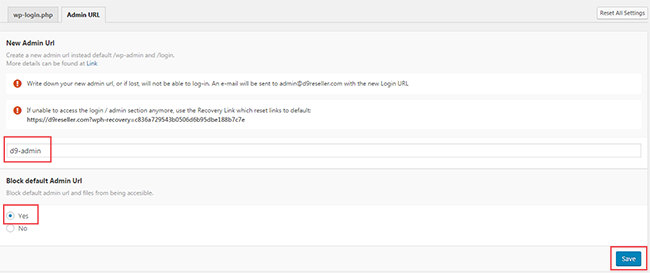
Under the “Block default Admin URL” heading, click on “Yes” and then click “Save”
IMPORTANT: Make sure you make a note of your new admin paths, if you forget what you set them to then you wont be able to access your WordPress admin area!
In my example I set my new wp-login.php page as d9-login.php so my new login URL will be:
mysite.com/d9-admin.php
And I set my new wp-admin URL to d9-admin so my new admin URL will be:
mysite.com/d9-admin/
9. Disable xmlrpc.php
2023 Update – You can now use free firewall rules from Cloudflare to stop bots hammering your xmlrpc.php file
NOTE: If you are running the Website Firewall that we covered in step 6 then you can skip this section, since the firewall will prevent xmlrpc.php attacks.
NOTE 2: A common plugin that uses the xmlrpc.php file is Jetpack, so if you’re using the Jetpack plugin disabling xmlrpc.php will break some functionality of the plugin.
XML-RPC on WordPress is primairly used for your WordPress site to communicate with 3rd party programs. For example, you may have an APP on your phone that allows you to remotely post to your WordPress site and this is acheived using the WordPress XML-RPC service.
Unfortunately, the XML-RPC service is widely abused by bots to launch brute force and/or DDoS attacks both to and from your site, so unless you are specifically using the XML-RPC service we would recommend disabling it.
You have two options to disable XML-RPC in WordPress; option one is to add some code to your .htaccess file, as shown in this guide.
Option two is to use a plugin, and it just so happens the plugin we used in step 3 to disable wp-login.php can also be used to disable XML-RPC.
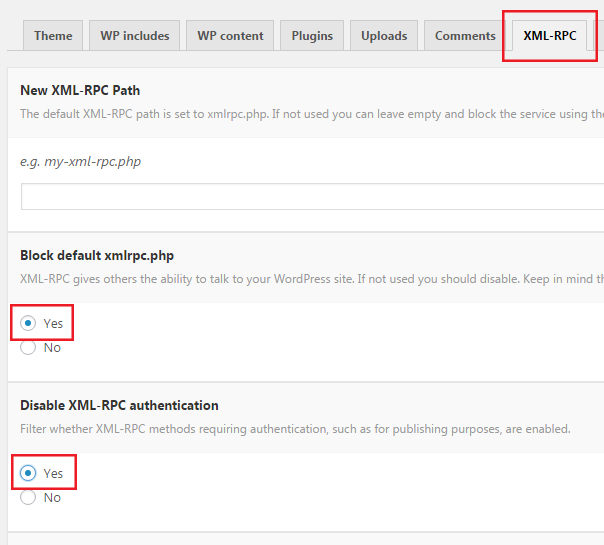
So log into your WordPress admin area and click on WP Hide> Rewrite > XML-RPC
And then set the options as shown in the screen shot below, and click on “Save”.
Conclusion
So if you’ve followed all of the steps and suggestions above, you won’t be a sitting duck when hackers, bots and nasties come-a-knocking. But remember that Security is an ongoing concern and that the main weakness in any security system is you! So before you upload that cool looking plugin or theme do your due diligence to make sure you haven’t just added another entry point for the hackers to exploit – secure usernames and passwords are no defence if you’ve got insecure plugins and themes running on your account.